March 02, 2022
Improve Security in Your Windows Environment with LAPS
This tutorial shows you how to install, configure and manage Microsoft’s Local Administrator Password Solution, a free security tool for your network.
As any administrator of Active Directory knows, every Windows system has at least one local administrator account with the keys to the kingdom of all network PC. Since local accounts and their respective passwords, including administrators, are not part of Active Directory (AD), you must manage each account on each computer separately.
This is digestible for a smaller environment. However, as your organization grows and more devices are added, you may start cloning. This cloning process, while helpful at first, is a ticking time bomb for your security. Each cloned machine will have the same admin password as its ancestor, making it easy for a master admin password to fall into the wrong hands.
Less severe, but still an admin nightmare, is having a mix of network passwords out there that you no longer control.
You need a sustainable long term solution that allows you to to secure your AD-joined computers, manage your local administrator accounts and their respective passwords.
That’s where Microsoft LAPS comes in.
What is Microsoft LAPS?
Microsoft Local Administrator Password Solution (LAPS) helps you create a separate administrator password with customized attributes for your domain password policies, such as complexity, length and/or term. A silent but vital part of keeping Windows environments secure, LAPS works by automatically randomizing the local administrator password on all domain computers and changing each password on terms that you define.
LAPS also ensures that you have randomized local administrator passwords across your domain-joined machines. This makes it easy to thwart hackers or the spread of malware, by forcing attackers to discover a password for each individual machine on your network.
Free to use and easy to manage, LAPS can drastically reduce the blast radius of any security incident.
Elements of LAPS
There are three key parts to LAPS:
- Locked Down AD Attributes
LAPS stores each local administrator password for every controlled computer in AD, in an attribute called ms-Mcs-AdmPwd within the AD schema. LAPS-enabled Expiration for those passwords is stored in another, separate AD attribute called ms-Mcs-AdmPwdExpirationTime. These AD attributes can only be read/written by specified AD security groups.
- GPO Settings
LAPS also has a set of Group Policy Object (GPO) settings it reads. When the GPO is linked to a set of computers via an Organizational Unit (OU), the LAPS-specific GPO settings are distributed to each computer. When the computer applies GPO settings, LAPS uses a special dynamic-link library (DLL) file to translate those GPO settings.
- Password Expiration
When a password expires, a new randomized password is set and written to the ms-Mcs-AdmPwd attribute in AD. The clock is reset and a new date time is written to the AD attribute ms-Mcs-AdmPwdExpirationTime.
Installing/Configuring LAPS
You can install and configure LAPS to your system in five main steps:
1. Install the LAPS management tools on your admin machine
2. Extend the AD schema to add the two custom AD attributes LAPS uses
3. Set appropriate privileges for various components in AD
4. Build the LAPS GPO that will be applied to Windows computers
5. Deploy the LAPS GPO extension to applicable Windows computers
There are some prerequisites that need to be met for LAPS to be successfully installed and configured:
- An AD domain (2003 and newer)
- A computer running Windows with RSAT for Active Directory and Group Policy Management installed
- An account that is both a member of the AD domain admins and schema admins groups. Best practice for the schema admin group is to only be a member when you need the permissions; remove yourself from this group after LAPS is configured.
- Never enable a LAPS GPO that targets the domain controllers – it’s not supported and may cause unexpected problems
A Step-By-Step Installation and Configuration Walkthrough
In this tutorial, I will be using the following
- Domain: corp.itarundaniel.com
- File share: \\dc01\share
- Test Workstation: TESTING01
To get started, you must first install the LAPS management tools on your admin computer. These management tools will install both the LAPS GPO extension (if selected) and the management tools to configure LAPS.
Start by downloading the LAPS.x64.msi file from: https://www.microsoft.com/en-us/download/details.aspx?id=46899
For those following along with PowerShell: Start-BitsTransfer 'https://download.microsoft.com/download/C/7/A/C7AAD914-A8A6-4904-88A1-29E657445D03/LAPS.x64.msi.
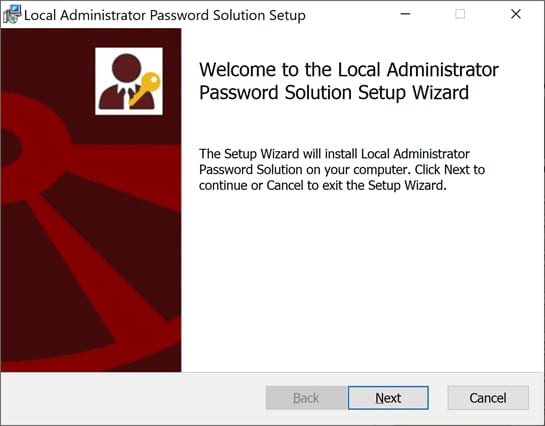
Once downloaded, launch the msi file as an admin and click “Next.”

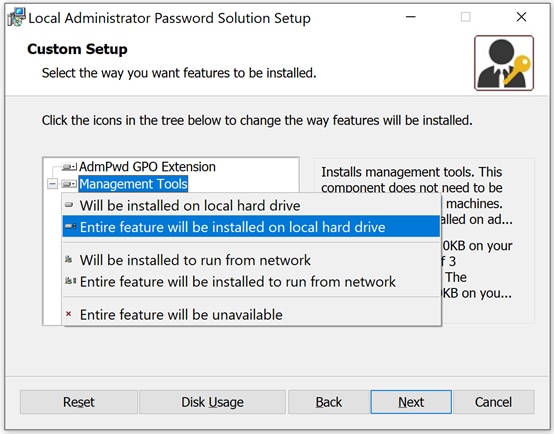
Press “Next” until you come to the custom setup, then click “Management Tools” and “Entire feature will be installed on local hard drive” to install both of these components.

Click “Next” until the install finishes and exit the installer.
You have now installed the LAPS GPO extensions and the LAPS management tools. We can now start extending the AD schema and adding our GPOs.
Extending the AD Schema
As stated earlier, LAPS uses two AD attributes called ms-Mcs-AdmPwd and ms-Mcs-AdmPwdExpirationTime. These two attributes are not default to Active Directory and must be added to the AD schema.
Open PowerShell as an administrator, using an account that has schema admin rights.
Type Update-AdmPwdADSchema to update the AD schema, which adds the two AD attributes.

If the status shows “Success,” the AD schema has been extended to support LAPS and is ready to set permissions in Active Directory.
Active Directory Permissions
Each computer needs the ability to update their local administrator password and expiration time AD attribute. To do that, each computer must have self-write permission to the ms-Mcs-AdmPwd and ms-Mcs-AdmPwdExpirationTime AD attributes. Luckily, most of this work is easily done with the AdmPwd PowerShell module.
Allowing Machines to Save Their Password
To ensure each computer can save its password and update when that password expires, the AdPwd PowerShell module has a command you can set for these permissions called Set-AdmPwdComputerSelfPermission,which applies to all child OUs.
In PowerShell, run Set-AdmPwdComputerSelfPermission -OrgUnit 'ou=computers,ou=corp,dc=corp,dc=itarundaniel,dc=com'
Remember to update your specific OU and domain name.
Rinse and repeat the above command for each OU in AD.
Granting Permission to Read and Reset the Local Administrator Password
You will need to create two AD groups for reading and resetting the local admin password called “LAPS Workstations Password Read” and “LAPS Workstations Password Reset.”
With a PowerShell console still open in your admin account, enter the following commands to give both AD groups permission to read the local administrator password for computers in the Workstations OU.
Set-AdmPwdReadPasswordPermission -OrgUnit 'OU=Computers,OU=Corp,DC=corp,DC=itarundnaiel,DC=com' -AllowedPrincipals "LAPS Workstations Password Read"
Set-AdmPwdResetPasswordPermission -OrgUnit OU=Computers,OU=Corp,DC=corp,DC=itarundnaiel,DC=com' -AllowedPrincipals "LAPS Workstations Password Reset"

These commands have enabled the AD groups above to read and reset local administrator passwords for computers in the Workstations OU.
Group Policy
For LAPS to enable itself once installed on computers, you will need to first create a group policy by importing the group policy templates to the PolicyDefinition store. The PolicyDefinition store is a folder located on all domain controllers.
1. Pick out a domain controller in AD (any domain controller will work)
2. Browse to \\corp.itarundaniel.com\SYSVOL\corp.itarundaniel.com\Policies
3. Ensure a ‘PolicyDefinitions’ folder in this location exists
If this folder DOES NOT exist, create it now.
If this folder DOES exist, make a backup of the folder (since we will be modifying the contents of it).
Copy the contents of C:\Windows\PolicyDefinitions on your admin computer (the one you installed LAPS on) to \\corp.itarundaniel.com\SYSVOL\corp.itarundaniel.com\Policies\PolicyDefinitions folder on the domain controller and choosing to skip the files that are already there.
Creating GPOs
The first GPO we will create will control the attributes of the LAPS settings when hitting the downstream computers. This GPO will control the password complexity and settings, letting LAPS know the administrator account name in case you change it for your domain.
- Open Group Policy Management under your admin account
- Find and right-click on Group Policy Objects
- Click on "New'
- Call this GPO ‘LAPS’
- Edit the GPO you just created
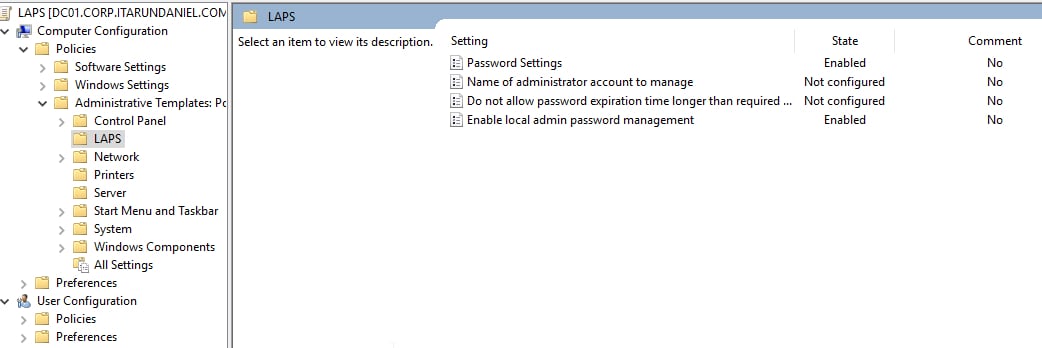
- Navigate to Computer Configuration —> Administrative Templates —> LAPS
Once done, enable local admin password management to “Enabled.” If you have different requirements for Password complexity, edit the Password Settings accordingly. If you changed your administrator account name for your domain computers, set it here.
Once done, close out of the GPO, but not the Group Policy Management console, since we need to create one more GPO.

LAPS Install
This GPO will install LAPS for any machine that requires it, or any workstations that you want to manage.
- Find the LAPS.x64.msi file from earlier and copy it to a network share accessible by all domain computers
- If you are not in it, open Group Policy Management under your admin account
- Find and right-click on “Group Policy Objects"
- Click on “New"
- Call this GPO “LAPS Install”
- Edit the GPO you just created
- Navigate to Computer Configuration —> Policies —> Software Settings —> Software Installation
- Right-click on “Software Installation” and navigate to New—> Package…
- Navigate to the share that you copied LAPS.x64.msi, select it, click “OK” and select “Assigned"
- Exit out of the GPO

OU Linkage
At this stage, both GPOs are created and ready to go. You can now link the GPOs to a test OU or OUs as you see fit.
Other Ways Without GPO
If you want to run the same process but another way, you can easily do that using these methods or a variation of them with the tools you have to push out software. At the end of the day, you have to install the extension by either installing the MSI or by registering the LAPS DLL file.
MSI Install
If you choose to install the MSI on every computer inside of a LAPS-controlled OU, run the following command to enable LAPS: msiexec /q /i \\dc01\share\LAPS.x64.msi
DLL Registration
If you choose to enable LAPS by registering the DLL, you can do so with the following command: regsvr32.dll \\dc01\share\AdmPwd.dll. You can find the AdmPwd.dll on the LAPS server at “C:\Program Files\LAPS\CSE.”
Testing LAPS
To ensure that LAPS is working as designed on the controlled computers, let’s now force one of the computers to apply the previously mentioned GPOs.
Restart a computer that’s located under one of the OUs you just configured. Once up and running, the computer should begin installing LAPS.
After LAPS finishes installing, reboot the machine once again. Then open up a PowerShell console as administrator on your admin computer as an account that’s a member of the LAPS Workstation Password Read and LAPS Workstation Password Reset AD groups.
Once the test machine comes back online, on the admin server open up PowerShell and run Get-AdmPwdPassword TESTING01 to get the password of the local administrator. If all goes well, you’llsee something similar to the screenshot below.

Now try to log into the LAPS-controlled computer with the displayed password above. If the LAPS gods are happy and it all worked, you should be in.
Try to reset the password by running Reset-AdmPwdPassword TESTING01 and rebooting the test computer (or running a gpupdate/force on it). You should see the password has changed.

Tips and Tricks
Turn On Auditing
Auditing when someone reads or resets a password is important, because it can instantly alert you if someone reads the password of all computers. The LAPS AdmPwd module provides us with a cmdlet to enable auditing.
Set-AdmPwdAuditing -AuditedPrincipals Everyone -OrgUnit "
OU=Corp,DC=corp,DC=itarundaniel,DC=com"
Reset the Ms-Mcs-AdmPwdTime Attribute During Disk Imaging
You must remember to reset the ms-Mcs-AdmPwdTime attribute when reimaging a LAPS-controlled computer.Otherwise it will not trigger the password change and will keep the local admin password. It will, however, trigger after the ms-Mcs-AdmPwdTime expires.
To reset the Expiration Time you can run Get-ADComputer TESTING01 | Set-ADObject -Replace @{"ms-mcs-AdmPwdExpirationTime"=(Get-Date)}
AD Recyle Bin
Enabling the AD Recycle Bin will keep ms-Mcs-AdmPwd protected from deletion even while you're deleting objects in AD.
Not For Temporary Access
LAPS is not meant to give temporary access to vendors, consultants or users. Instead of using LAPS, use an AD group that’s a local admin of that specific computer and use TimeToLive on group memberships.
Arun Daniel is a Sr. Consulting Engineer for Data Center and Cloud Services at CDW with more than 20 years of experience designing, deploying and managing all aspects of data center and cloud services. For the past 10 years, his primary focus has been migrations from on-premises data centers to Amazon Web Services. Arun holds numerous AWS certifications, as well as HashiCorp, Microsoft Azure, VMware and Cisco certifications.
