Security-Focused Architectural Styles for Hosting Web Applications in Public Cloud
Using AWS, and other public cloud tools, to secure your internal applications.

Security is one of the important factors to consider when architecting and deploying solutions, especially in public cloud. Depending on the type of web application, you may need to resort to different ways of securing applications and underlying infrastructure. For example, excluding any regulatory constraints, internet-facing applications are publicly available to all users. An organization may have applications that need to be made available only to its employees.
Learn about CDW’s AWS Practice.
While setting aside the use case of Single-Sign-On (SSO) deployment using external identity providers such as Active Directory Federation Service (ADFS), Azure AD, Okta or OneLogin, there are no valid reasons to make these applications publicly accessible. Organizations may also leverage technologies such as Akamai or CloudFront to distribute the content to multiple regions to improve availability and performance.
For illustration, the examples in this blog post use AWS-specific terminologies. However, the architectural components presented here are generic enough to be applied to other public cloud providers as well.
Securing Internet-Facing Applications
The following diagram shows an example of an architecture for securing internet-facing applications. It leverages multiple technologies such as Amazon Route 53, Web Application Firewall (WAF), CloudFront, Load Balancers, etc. for deploying internet-facing applications securely. These help protect the endpoint for different attacks such as SQL injection, cross-site scripting, blocking bad IP addresses and handling Distributed Denial of Service (DDoS) attacks. WAF also supports monitoring of the endpoint as well as helping enforce rate limits of incoming requests, where applicable.
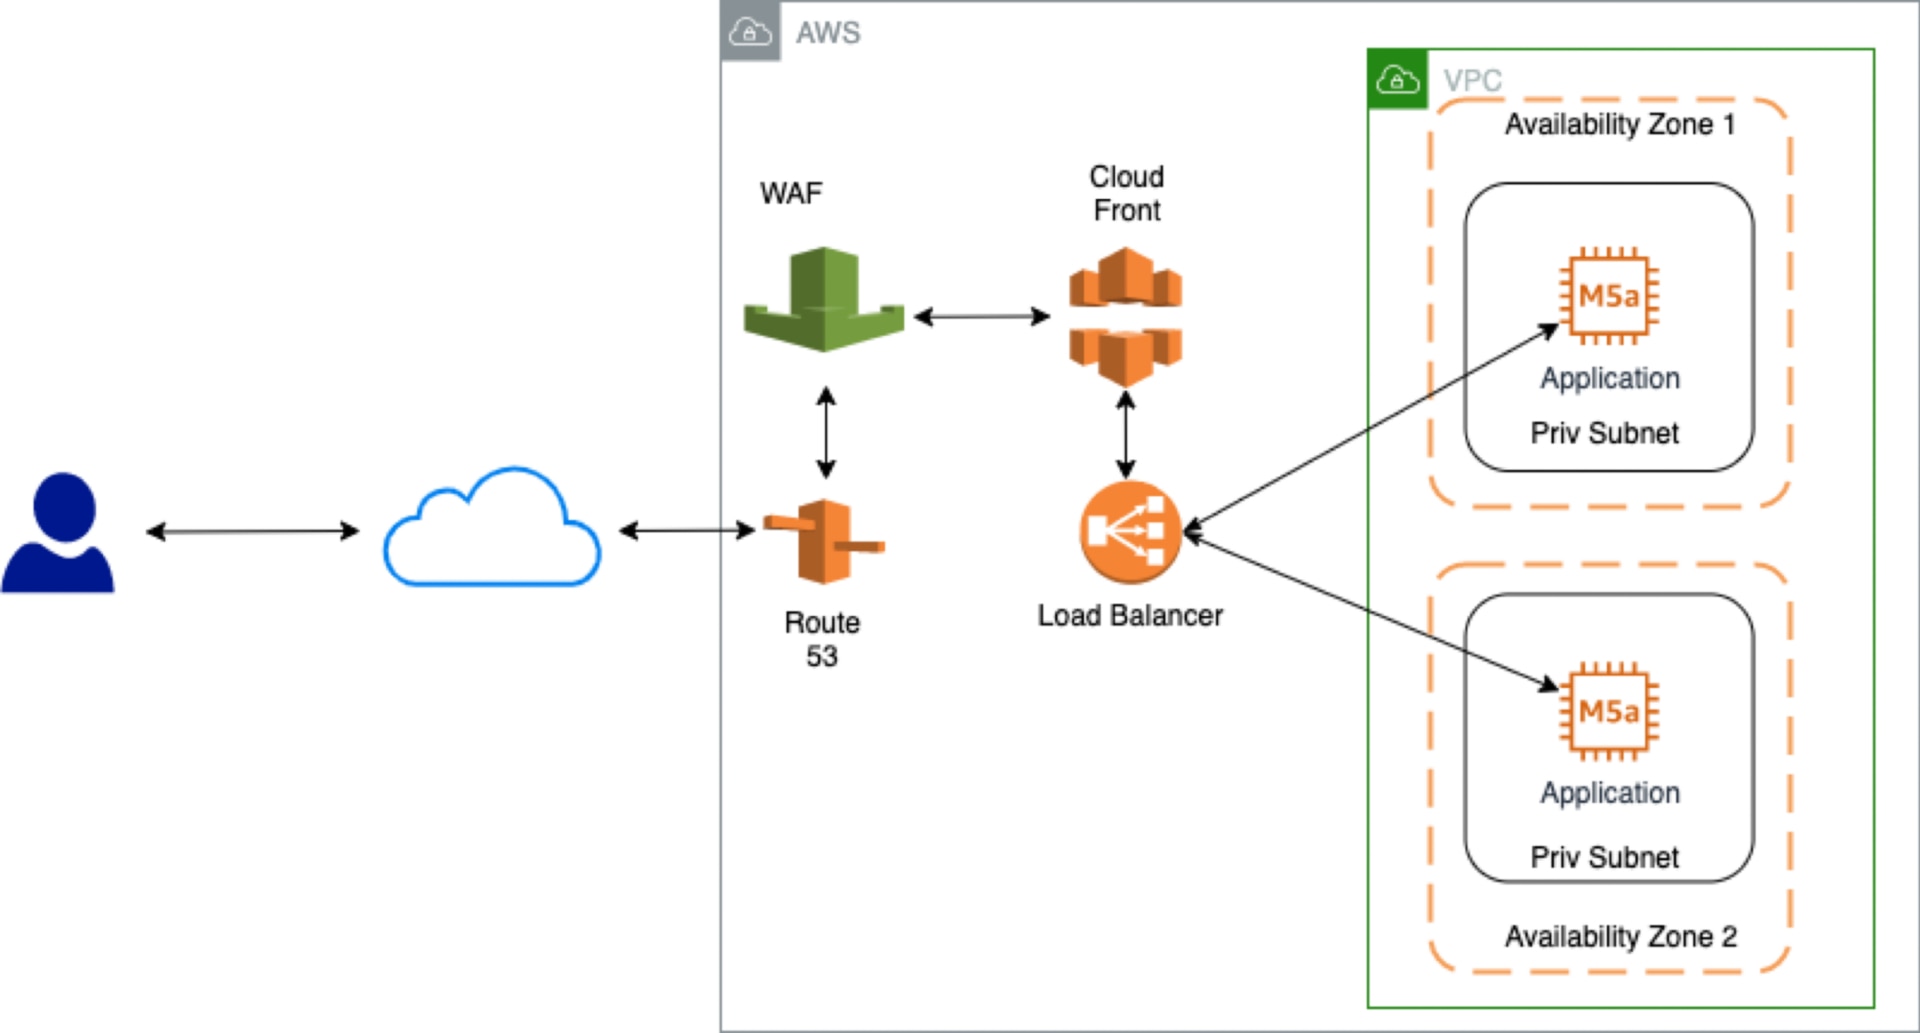
As the example shows, the incoming user connection is terminated in an application load balancer (a service from AWS) and the load balancer forwards traffic to the application servers (target instances) deployed in private subnets. Since the applications are deployed in private subnets, they’re not directly accessible from the public internet. The security group of the application is also configured to allow incoming traffic only from the application load balancer. A sudden increase in traffic, up to certain limit (for example, due to DDoS attacks) would be absorbed and handled by in-built Route 53 mechanisms and CloudFront.
Securing Internal Applications
There are many internal applications that are to be consumed by employees solely within the organization’s intranet. Traditionally, these applications would be deployed in the organization’s on-premises data center. The application instances would be allocated private IP addresses and the router would not route these packets outside the organization’s intranet. There are multiple ways of securing internal applications when they are migrated to public cloud. A few of these options are illustrated in the following paragraphs.
Option 1: Using External Identity Provider
Like other SAS applications, these applications would be available in the public internet. The authentication information is provided by a Security Assertion Markup Language (SAML 2.0) compliant identity provider such as Azure AD, Okta, Onelogin, etc. User identity is sourced from organizational identity providers such as Active Directory. MFA can be added to provide a second layer of authentication for these applications.
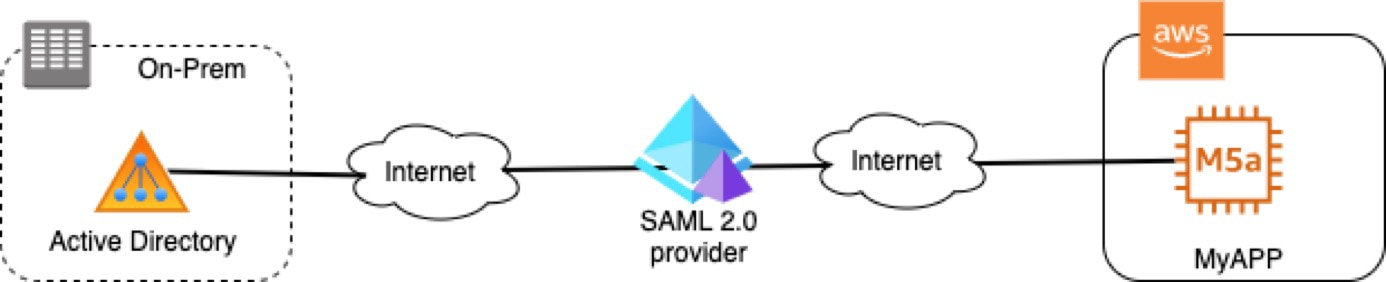
If the current application doesn’t already support authentication using the SAML 2.0, then some additional architecture and development effort is required on the backend to integrate with a SAML provider.
Option 2: Using Private Network Connectivity
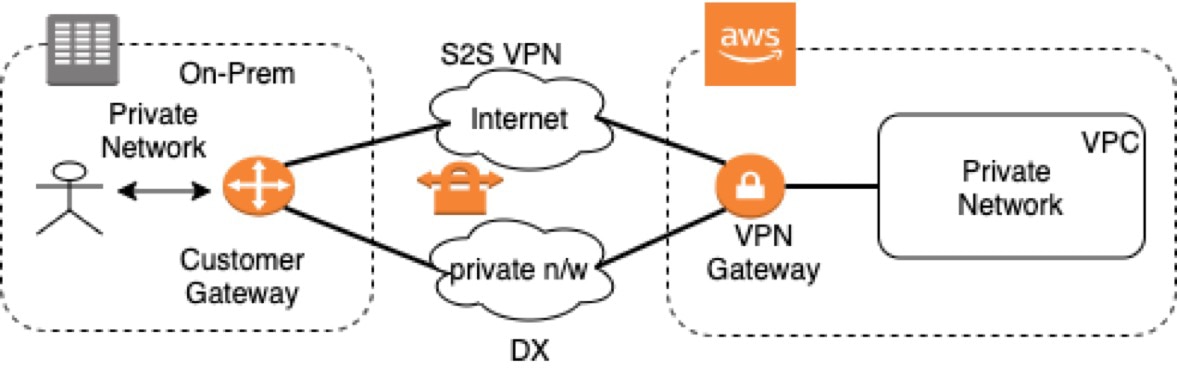
In this option, an on-premises private network is extended to the cloud using a site-to-site (S2S) VPN or Direct Connect (DX). This can be useful for some enterprises with an on-premises data center that requires a hybrid mode of operation. For example, applications and database servers need to be running both in the cloud and in on-prem infrastructure. The S2S VPN uses the internet for routing packets between the on-prem network and the cloud. The packets are encrypted using a secure protocol such that the content of the packets would be meaningless for hackers sniffing the packets enroute. DX creates a private dedicated connection between the on-premises data center and the cloud vendor.
The router establishes connectivity between two private subnets: one inside AWS and another on-premises. Even though the VPN gateway and router would have public IP addresses, the packets are encrypted when they traverse the internet. In this regard, this technology allows you to extend the on-premises environment to AWS.
For handling these use cases, enterprises deploy a customer gateway in their on-premises data center and a VPN gateway on the AWS site. Essentially, this expands their internal network to AWS and allows users to access their internal applications running in AWS cloud. When the user is inside the on-premises network, they’ll have access to the applications running in the cloud. If the user is remote, they would need to first use a VPN tunnel to access the corporate network, then they can access apps running in the cloud seamlessly.
I would not recommend using similar architecture for deploying an intra-organization internal web application to the cloud, as unnecessarily exposing the endpoint to public would likely create some security risk to the application.
Option 3: Minimalistic Architecture
In certain situations, it may not be justified from a business perspective to use the two options listed above. This situation can arise when organizations are in the starting phase or without an on-premises data center and their entire operation is in the public cloud; they only have a handful of employees with a limited number of internal applications. One of the possible solutions is illustrated in the following diagram. In the example that follows, Jenkins server is for the purpose of illustration only. Jenkins server can be replaced with other internal applications.

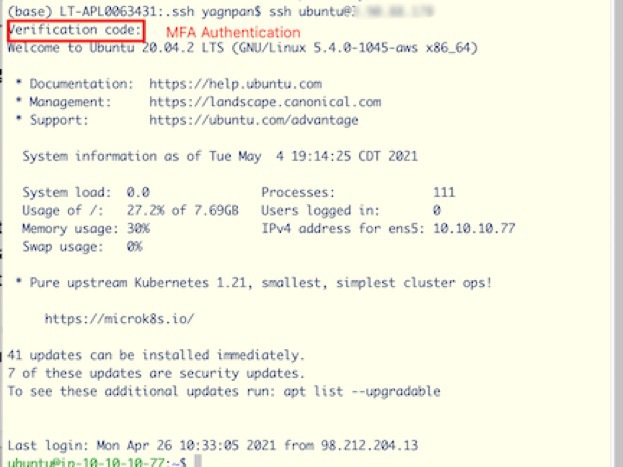
As illustrated in this diagram, this solution utilizes an internet-facing public subnet and a private subnet. The public subnet only has a Bastion server, and the private subnet can host several internal servers and applications (such as GitLab and Jenkins server). The Bastion server is hardened with the latest security patches and has instance firewall (iptables) enabled. No other services would be provisioned to run in the Bastion server. Each employee requiring access to the internal application have their own account in the Bastion host with their unique SSH keys. The Bastion server’s security group is configured to allow SSH traffic in the designated port only from the IP addresses (/32 CIDR) of the employees requiring access to the application deployed in the private subnet. Multi-factor authentication is also enabled using Google Authenticator for extra protection of the Bastion host. To log on to the Bastion server, the employees need to have the SSH keys and the constantly changing authentication code.
The internal application is deployed in a private subnet, and in this instance security groups allow incoming connections only from the Bastion server. Since the server only has a private IP address, this server would not be reachable by the public.
To use this setup, the employee creates a ~/.ssh/config (assuming Mac or Unix terminal) as follows:
Host 54.87.199.188
User ubuntu
IdentityFile ~/.ssh/bastion-ue1.pem
Host 10.10.*
User ubuntu
IdentityFile ~/.ssh/ec2-ue1.pem
ProxyCommand ssh ubuntu@54.87.199.188 -W %h:%p
The first section in the configuration file starting with “Host 54.87.199.188” is the public IP address of the Bastion host. It uses identity file bastion-ue1.pem stored in the ~/.ssh directory and the login name in the Bastion server is ubuntu. The second section starting with “Host 10.10.*” is the block of instances in the private subnet with ubuntu username and ~/.ssh/ec2-ue1.pem as the provisioned private key for accessing the server. The SSH command to login to the instances in the private subnet is routed via the Bastion server using the ProxyCommand.
Alternatively, one can also use the ssh agent (in the local machine, employee’s private laptop) for forwarding the request.
% ssh-add -k ~/.ssh/bastion-ue1.pem
% ssh-add -k ~/.ssh/ec2-ue1.pem
While attempting to login to the server, the ssh agent presents the list of configured keys when a challenge request is received. Using this approach, the SSH keys are temporarily held in memory and will not be available when the computer is rebooted, or the agent is restarted on the local machine.
With the above configuration in place, a user initiates a port forwarding request to the internal web apps hosted in the private subnet by issuing command such as the following:
% ssh -L<local port>:<target host>:<targetport> <bastion server user name@bastion server>
% ssh -L 8098:10.10.10.22:8080 ubuntu@54.87.199.188
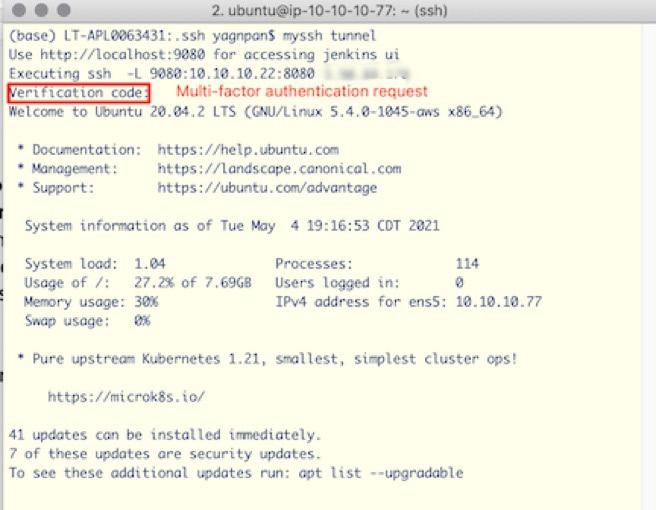
This command makes the remote application (for example, the Jenkins server) running in the private subnet (with private IP address 10.10.10.22 at 8080 port) accessible in the user’s local laptop at port 8098. This command forwards the request to 10.10.10.22 using Bastion host 54.87.199.188. Once the connection is established, the user can access the internal web application at https://localhost:80980 in a browser in their local machine. The Bastion host simply provides a conduit between the user’s laptop and the destination server. A sample interaction for ssh and creating a tunnel is illustrated in the diagram below.
CDW’s AWS Practice
CDW has a mature AWS practice both in the professional and managed services areas that include highly technical resources such as solutions architects, delivery engineers, technical account managers (TAMs), and operations and DevOps engineers. CDW can assist your organization by providing thought leadership to help you in your cloud journey.
